Harmonybeam 1.2 is here, and this update is about making it even faster and even more convenient to create chord progressions inside Ableton Live.
Harmonybeam was built as a chord progression plugin for Ableton Live, with a focus on fast harmonic exploration, smooth voice leading, and an interface that feels closer to arranging music than fiddling around in a piano roll. Version 1.2 builds on that idea with several workflow features requested by users: rest blocks, chord locks, expanded rhythm controls, synced clip labels, and a longer list of notation, voicing, and UI improvements.
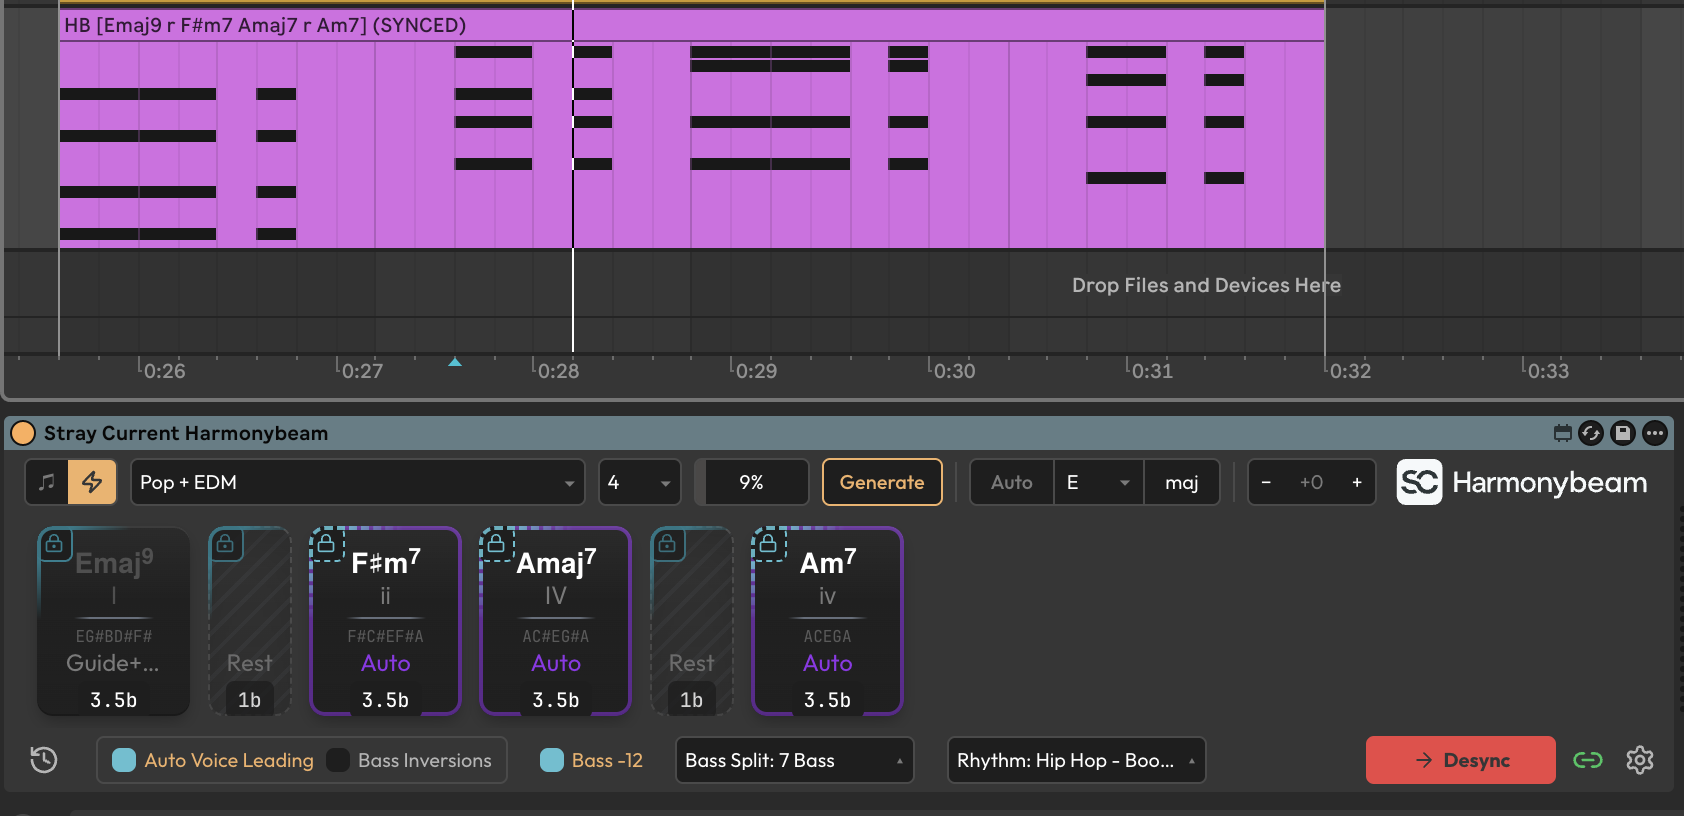
The headline change is that Harmonybeam can now use rests and lockable chords to retain a specific structure over different progressions. You can create a progression with rests, varying chord lengths, create a specific harmonic rhythm, then preserve that shape while generating new chord progressions. For anyone using Harmonybeam as an Ableton chord progression generator, this is a major improvement: you no longer have to choose between starting fresh and manually rebuilding the same phrase structure over and over.
Below is a closer look at what is new in Harmonybeam 1.2. You can also read the full Harmonybeam 1.2 changelog in the manual.
Rest blocks: pauses between chords, independent of rhythm patterns
Harmonybeam 1.2 introduces rest blocks, a new block type for inserting pauses between chords.
Previously, rests and pauses were mostly handled through rhythm patterns or by editing MIDI after generation. That worked, but it meant that silence was not part of the visible harmonic structure in the same way chord blocks were. In 1.2, rests now live directly in the chord strip. They can be added, moved, resized, edited, and reused just like regular chord blocks.
You add these rests with a new button next to the one for adding chords. Once inserted, a rest block behaves like a normal chord block in the arrangement sense: you can drag it, change its length, position it between chords, and use it as part of the phrase structure. If you decide that a rest should become a chord, you can click it and turn it into a regular chord. The opposite direction is also available: when hovering over a chord’s delete button, a new option lets you convert that chord into a rest block instead of removing it entirely.
Rests can also be entered directly in the text input bar, which keeps Harmonybeam’s text-based workflow intact. If you prefer typing progressions quickly instead of building everything with the mouse, rests can still be part of that process.
This sounds small, but it changes how the device can be used. Rests are no longer just a byproduct of a rhythm preset. They can be part of the actual harmonic form: a half-bar pause before a cadence, a gap between two phrases, a brief silence before a modulation, or a repeated structure where the negative space matters as much as the chords.
For producers using Harmonybeam as an Ableton chord device, this is especially useful because it keeps the musical phrase readable. You can look at the chord strip and see not only which chords are present, but where the harmony intentionally stops.
Chord locking: preserve parts of a progression, regenerate the rest
The second major addition is chord locking.
When hovering over chord blocks in Harmonybeam 1.2, a new lock icon appears in the top-left corner. This cycles between three states:
- Unlocked: the normal state. The chord can be fully modified or replaced.
- Shape Lock: the chord identity can change, but the block length is preserved.
- Full Lock: neither the chord identity nor the block length can be changed by generation.
Shape Lock is designed for keeping the timing and structure of a block while allowing the chord itself to change. Full Lock is designed for preserving something as-is: a rest or a specific chord you want to keep fixed while generating around it.
This gives Harmonybeam a more flexible approach to chord generation. Instead of replacing the existing contents of the chord strip on every new generation, you can decide what should remain stable and what should be open to change.
For example, you might create a four-bar phrase with unusual chord lengths and a couple of rests. Then you can shape lock the chord blocks and fully lock the rest blocks. When you click Generate, Harmonybeam can replace the chords while preserving the phrase structure. The result is a new progression that follows the same rhythmic and formal outline.
This is useful when you like the contour of a part but not the exact harmony yet. It is useful for arrangement work, where the structure of a phrase is often already doing the right thing, but the chords still need alternatives.
Full Lock is also useful: protecting a specific chord or rest while the chords of the progression change. Maybe there is a particular opening chord, substitution, approach chord, borrowed chord, or resolution you want to keep. You can fully lock that block and continue generating around it.
It is important to note that global transposition and voicing style changes can still apply to locked chords. Full Lock prevents generation from replacing the chord, but will still transpose it on transposition changes, and its voicing style can also be changed independently. Harmonybeam’s automatic voice leading will also change its voicing if enabled.
Reusable harmonic rhythm and progression structure
Rest blocks and chord locks are features that become most powerful together.
You can create a specific structure first: maybe long opening chords, short passing chords, a pause before the end of the phrase, or a syncopated pattern of block lengths. Then you can decide which parts of that structure are fixed and which parts are open. Shape Lock keeps the block lengths. Full Lock keeps exact blocks, including rest blocks. Generation then works inside those boundaries.
That makes Harmonybeam more useful as a compositional tool. It can help you explore alternatives while respecting the formal decisions you have already made.
This is particularly handy for:
- trying different chords over the same arrangement shape
- generating variations for a verse, chorus, bridge, or breakdown
- keeping pauses and phrase endings intact
- preserving a particular chord while changing the surrounding harmony
- building a reusable harmonic rhythm template
- creating multiple progression options that fit the same MIDI or clip length
For Ableton Live users, the practical benefit is speed. You can stay in the device, keep the phrase structure visible, and audition different harmonic versions without constantly repairing the rhythm afterwards.
Expanded Rhythm dropdown: Pattern Flow, Legato, and Phase
Harmonybeam 1.2 also adds a new sidecar panel to the Rhythm dropdown. This panel contains three new settings: Pattern Flow, Legato, and Phase.
These controls make rhythm presets more flexible and more musical, especially when combined with longer chord blocks, repeated chords, and sustained parts.
Pattern Flow
Pattern Flow controls whether a rhythm pattern restarts on each chord block or continues across the progression.
When a pattern retriggers on every block, each chord gets the same rhythmic starting point.
When a pattern flows continuously, the full pattern carries through from one block to the next, including rests. Instead of every chord change resetting the rhythmic idea, the pattern keeps moving.
This is one of those settings that can change the feel of a progression. It is recommended to play around with it to see what you prefer in a particular situation.
Legato
Legato controls whether identical notes can be tied across chord blocks when note length and placement allow it.
This matters because chord changes do not always require every note to retrigger. If two adjacent chords share a common tone, it can be sustained, or tied instead of retriggering on the second chord. Tying it across the change can create a smoother, more connected result.
For pads, strings, ambient layers, slow-moving harmonic beds with long attacks, and cinematic voicings, this can make a large difference. Sustained common tones help a progression breathe. They also make voice leading easier to hear, because the listener can perceive which notes remain stable and which notes move.
To support this workflow, Harmonybeam 1.2 adds a new rhythm pattern called Hold. Hold sustains notes for the duration of the block. When Legato is enabled, notes can be tied for as long as the surrounding chord changes permit. This is useful for long pads, string arrangements, and slower harmonic movement where you do not want every chord change to produce a full retrigger of all notes.
Phase
Phase controls the starting offset of a rhythm pattern in eighth-note steps.
This is a fast way to create variations from existing rhythm presets. Instead of choosing a completely different pattern, you can shift the phase and hear the same pattern from a different rhythmic angle. A small phase change can turn a familiar preset into something that feels syncopated, delayed, pushed forward, or more spacious, depending on where the beats fall.
For producers, this is one of the quickest ways to get more mileage out of the built-in rhythm material. It is also useful when a progression is harmonically right but rhythmically sitting in the wrong place against drums, bass, or other parts.
Synced clip labels: see the chords without reopening the device
Harmonybeam 1.2 adds a small but very practical improvement to synced clips: generated clips now carry labels showing what they contain.
Chord clips are labeled with the chords of the progression, for example:
HB [Dm7 G7 Cmaj7 Am7]
Bass clips show the names of the bass notes instead:
HB Bass [D G C A]
The label updates as you make changes, which means you can quickly identify the harmonic content of a clip from Ableton Live without opening Harmonybeam or inspecting the piano roll.
This is especially useful during arrangement work. If you have several generated clips across different tracks, or if you are working on another instrument and need to reference the progression quickly, the clip label gives you the information at a glance.
It is a convenience feature, but a meaningful one. Chord progressions often become part of the session’s architecture. Being able to see them directly in clip names makes the project easier to navigate.
Keyboard shortcuts in the chord strip
Harmonybeam 1.2 expands keyboard shortcut support inside the chord strip. Shortcuts that were previously available in the input text bar are now also supported directly in the block workflow.
The supported shortcuts include:
- Cmd/Ctrl+A: Select all
- Cmd/Ctrl+C: Copy
- Cmd/Ctrl+V: Paste
- Cmd/Ctrl+X: Cut
- Cmd/Ctrl+D: Duplicate
- Backspace: Delete
This makes editing chord blocks faster, particularly when building or revising longer progressions. You can select, duplicate, copy, and remove material without constantly moving between the mouse and text input.
For anyone who uses Harmonybeam heavily as a MIDI chord generator inside Ableton Live, these kinds of editing improvements add up quickly. The less friction there is in rearranging blocks, the easier it is to stay in the musical idea.
Notation, spelling, voicing, and UI improvements
Alongside the larger workflow additions, Harmonybeam 1.2 includes a number of smaller improvements and fixes.
Roman spelling semantics have been improved for non-diatonic chords in some suggestion contexts. Short-form Roman notation now denotes dominant 7th chords more clearly. Some altered-suspended and suspended-dominant chord aliases have been added, including sus4b9, sus4(b9), 7sus4b9, 7b9sus4, 7susb9, and 7sus(b9).
Slash bass placement has been improved in some voicing style contexts, and mixed accidental spelling issues in certain slash bass scenarios have been fixed. Inversions that could inadvertently remove required pitch classes in some voicing styles, including Anthem, have also been corrected.
Several chord coloring and classification issues have been fixed, including sixth chord color classification, half-diminished chord coloring, and dominant-suspended chord coloring. Plain triads are now handled more reliably by Merge Variants.
There are also UI and compatibility fixes, including a fix for a stuck mode button in the Chord Wheel, layout and rendering corrections in the top row Generation mode, a fix for live clip updates on chord block resize, and a Live 10 issue where the voicing style button could sometimes be unclickable.
The default rhythm pattern Hold is now treated separately from Whole Notes, which matters especially with the new Legato behavior.
What’s next
The next update 1.3 will be a content-focused update and feature refinements to automatic voice leading, new rhythm patterns, improvements to the three existing chord progression generators (Classical, Pop & EDM, Jazz & Neo Soul) plus two completely new ones. Stay tuned for more details.
Get Harmonybeam 1.2
Harmonybeam 1.2 is available now for Ableton Live.
If you already own Harmonybeam, you can download the update and read the full release notes in the manual. If you are new to the device, you can learn more on the Harmonybeam chord progression plugin page or watch the full walkthrough video on YouTube to see how it works in practice.
Whether you are using it as an Ableton chord device, a chord progression generator, a Max for Live chord device, or simply a faster way to sketch harmonic ideas, Harmonybeam 1.2 should make the process smoother, more flexible, and more musical.
Find out more about how Harmonybeam helps you write better chord progressions in Ableton Live.
Explore Harmonybeam