The piano roll is the heart and soul of every DAW. It is where the actual composition is created, where melodies are drawn, where chords get built, where drums get nudged. It has become so central to how music software works that it barely registers as a design choice anymore. It is just there, like the time ruler and the play button.
But the piano roll is, arguably, not always an ideal surface for writing music. It is a great surface for editing MIDI — which is not necessarily the same. The piano roll is a jack of all trades and a master of none. It can represent anything MIDI can represent, and on the surface that looks like the logical choice. After all, a piano roll is, quite literally, a piano rotated vertically with a timeline added. To a degree, it maps onto the way a keyboard player thinks about music. But that is precisely where it becomes limited for building a composition on a screen. For anyone writing music with a mouse and keyboard rather than playing it in, that gap is the difference between flowing and fighting.
A brief history of how we arrived at the piano roll
The piano roll did not become the default because it is the best interface ever devised for musical ideas. It became the default because it is the most universal.
Notation software. Before MIDI editing existed in its modern form, composers working in software came from written notation — Finale, Sibelius, MuseScore, and their predecessors. Notation is precise and information-dense: it is the language performers have used for centuries. But it is a language. It requires reading music, and it carries centuries of convention and edge cases that have nothing to do with producing a track. Notation is also designed to be read by a performer, not built with a mouse. If your music education stopped at “learned to play some chords,” a score editor is a wall, not a door.
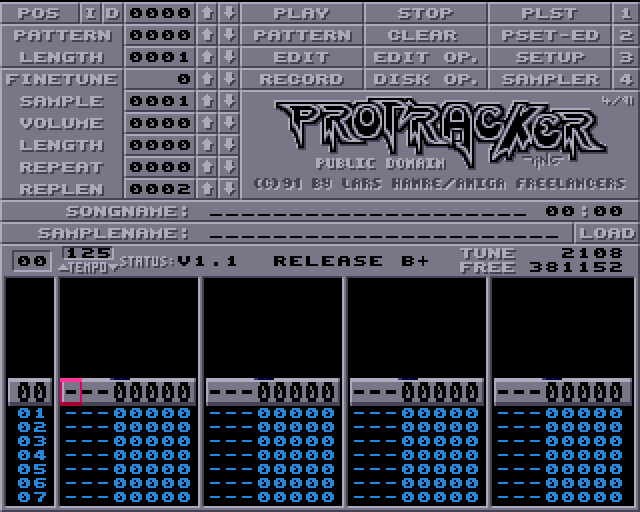
Trackers. For a while, there was a real challenger: the tracker. Starting on the Amiga in the late 1980s and living on in Renoise and other modern versions of the same concept, trackers represent music as a text-based grid of rows and columns — a note, a sample, a volume, an effect, per row, entered with the keyboard. To an expert, a tracker is absurdly fast: no mouse, no zooming, no dragging; your hands never leave the keys, and the whole song scrolls vertically past you like code. But trackers are opaque. They are a format with a steep learning curve, they push you toward a certain grid-based, loop-heavy way of thinking, and they reward the expert far more than they welcome the beginner. They mastered one way of working, at the cost of being approachable.

Step sequencers. The drum machine lineage — the 808s and their descendants — gave us pattern-based step sequencing: a lane per voice, a step per division, on/off and accent. It remains an exceptionally direct way to program rhythm. But once a step sequencer has to represent arbitrary polyphonic harmony, it tends to acquire pitch lanes and starts to resemble a piano roll.
The piano roll. MIDI’s rise in the 1990s settled the argument. The piano roll is the most direct possible mapping of MIDI data to a screen: time runs left to right, pitch runs bottom to top, and every note is a block that can be changed in size. It even takes its name from the punched paper rolls that once drove player pianos — an interface for controlling instruments that predates electronic music by decades. No music literacy required. No specialist vocabulary. It works with a mouse, it works in every DAW, and it can do pretty much everything, everywhere. That universality is exactly why it won.
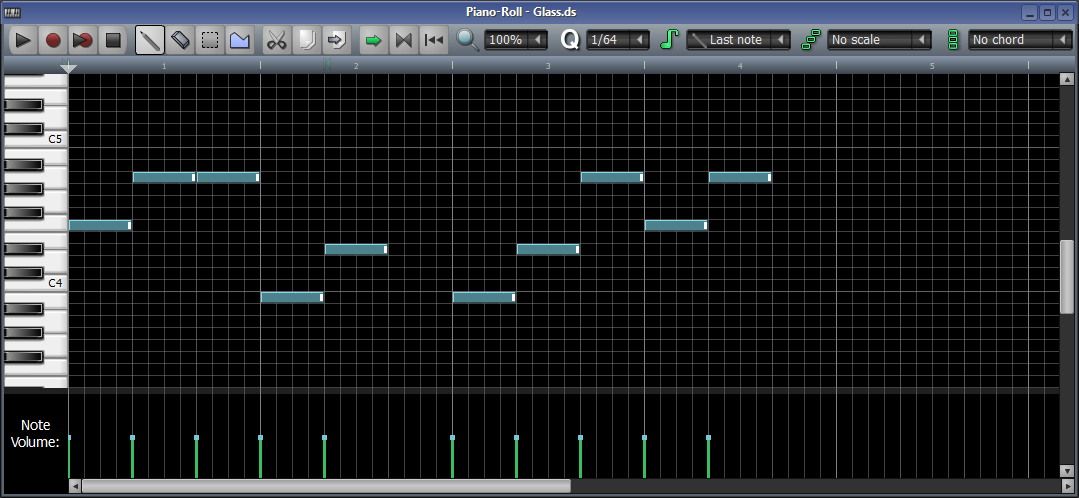

And that is the problem. The piano roll won by being nothing in particular. The tracker is the master of the vertical grid, the step sequencer is the master of rhythm, notation is the master of exact written form. The piano roll is the master of none of them, but it works well enough for all of them, so it became the place where everything gets done — often note by note.
The piano roll is a dumb representation of MIDI
Here is the core of it. A piano roll is a literal, faithful drawing of the MIDI data underneath it. For editing purposes, a MIDI note is usually presented through four values: pitch, start time, length, and velocity. The piano roll shows you those values as a block, and editing music in a DAW means editing those blocks.
The trouble is that MIDI — and therefore the piano roll — conflates two completely different things:
- The musical content: what the notes are — the chord, the melody, the harmony, the voice leading.
- The performance: how those notes are played — when they start, how long they hold, how they accent, how they’re ordered in time.
In a piano roll these live in the same place, drawn the same way. A C major chord in root position, a D minor in first inversion, a strummed guitar voicing, a rolled pad — all of them are just MIDI notes. The chord’s identity, its voicing, and the way it is performed are not separate attributes you can change independently. They are all folded into one pile of MIDI notes you have to push around by hand.
This is fine if you record music in. If you play a MIDI keyboard, the performance comes from your hands — the timing, the velocity, the feel all arrive as you play, and the MIDI notes are just a record. But if you write with a mouse, there is no performance. There are only dozens of little blocks, and you have to manufacture every musical decision by editing them a handful at a time.
What that costs: the voicing problem and the rhythm problem
Concretely, the conflation of content and performance means that changing one musical thing forces you to manually re-edit everything else. Two examples.
The voicing problem. Say you have Dm7 G7 Cmaj7 Am7 and you want a different voicing for a couple chords — an inversion, a wider spread, the top voice moved somewhere smoother. In a piano roll, a voicing is not an attribute of a chord. It is the exact vertical position of every note. So you select a stack of notes, move them up or down, check the voice leading against the surrounding chords, and repeat for every chord in the progression. Want to audition three voicings? That is three full passes of note surgery. The musical question — “does this voicing feel better?” — becomes an editing chore, and the chore is the same no matter how simple the question.
The rhythm problem. Say the progression is rhythmically right but harmonically wrong, or vice versa. Change one chord for another, and you now have to move the notes vertically, or delete and replace them outright. Change the rhythm of the whole progression, and you drag dozens of notes horizontally this time, fighting snap settings, or you just rebuild the whole thing. The harmonic decision and the rhythmic decision are tangled in the same MIDI notes, so you can never change just one.
Now multiply this by how many ideas you want to try in a session. The whole point of sketching is that ideas are cheap and disposable. But at note-editing speed, every “what if” is expensive. What if the chords were inverted there? What if the rhythm swung instead? What if the whole progression moved up a step? Each one costs a few minutes of moving MIDI notes, and the honest math of a creative session means you try the expensive ones less. The piano roll does not just slow you down — it quietly narrows the space of ideas you will ever reach. That is the flow-killer, and it is why so much mouse-written music ends up repeating the same three voicings and the same blocky rhythms: not because that is what the writer wanted, but because that is what was cheap to edit.
If you are still deciding how to get chord progressions into Live at all — stock MIDI effects, MIDI Tools, online generators, MIDI packs, or a dedicated device — the Ableton Chord Progression Generator: 5 Ways article compares all of them.
What if content and performance were separate?
This is exactly the problem Harmonybeam was built around. Harmonybeam is a Max for Live chord device for Ableton Live, and its whole premise is that the things MIDI forces together should be easily separable. Instead of one pile of MIDI notes, you get three independent layers, each describing a different musical dimension:
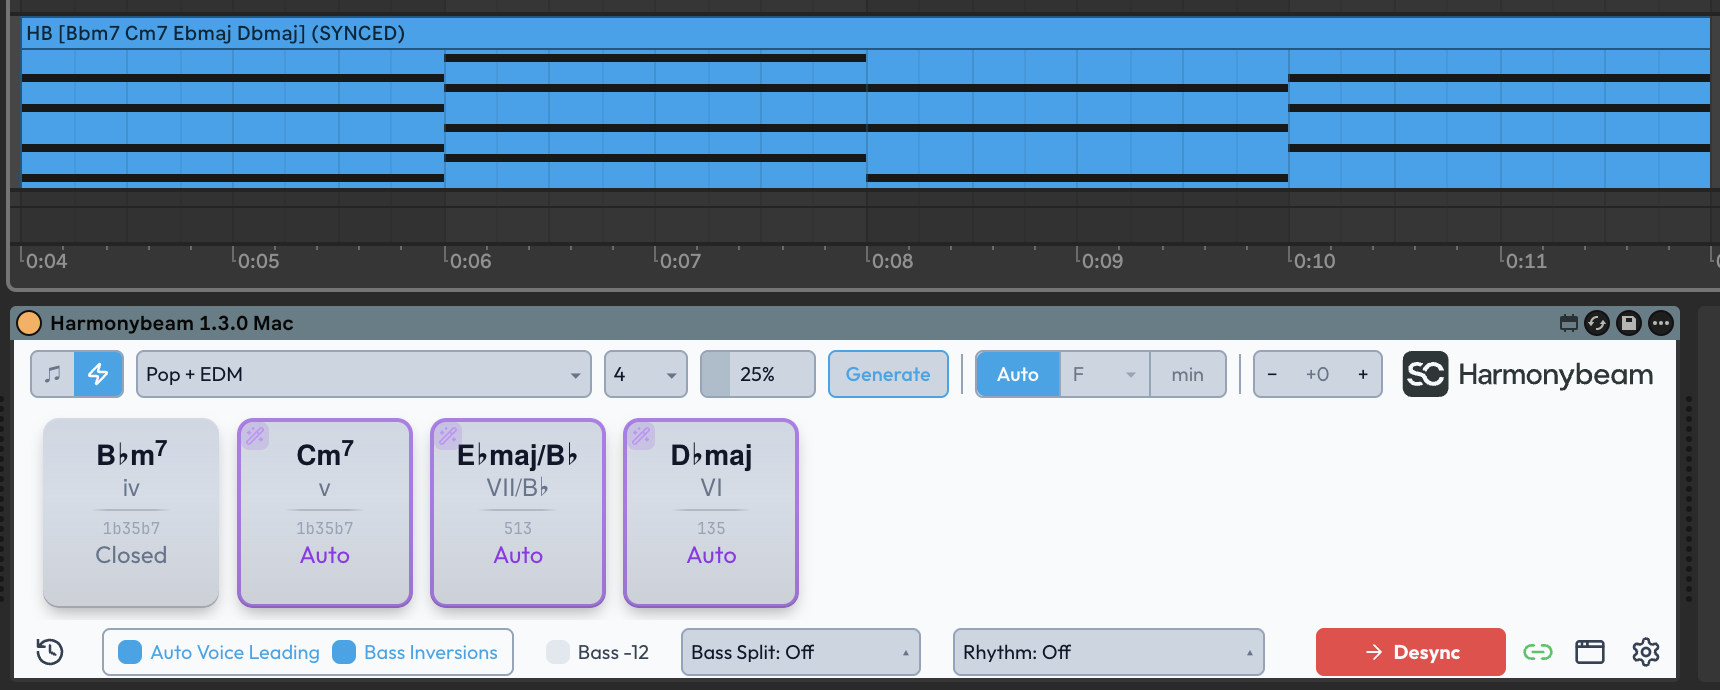
1. Chord blocks: what is played, and for how long
The progression is a strip of chord blocks. Each block is a chord — Dm7, G7, Cmaj7, whatever you type in the input bar or choose from the chord picker. Dragging the edge of a block changes how long that chord lasts, which lets you build the harmonic rhythm directly: a long chord here, a short passing chord there, a rest for a breath. Change Dm7 to Fmaj7 by dragging the block — the chord is a single object, and changing its length does not affect the others. Select all blocks and you can re-voice the whole progression in one action, or let automatic voice leading smooth the connections between chords.
2. Rhythm: the pattern the chords follow
The rhythm is not inherently baked into the chords. It is a MIDI pattern applied to the whole progression, chosen from the Rhythm dropdown and independent of which chords are there. In Harmonybeam 1.3, the new Pattern Editor gives you a full rhythm sequencer on top of more than 40 presets: a step grid with separate Bass, Body, and Top lanes, per-hit velocities, swing, pattern flow, legato, and phase. You can build a groove from scratch, edit a factory preset, or save your own. Change the rhythm of the track without touching a single chord — and audition a different groove without rebuilding anything.
3. Gestures: how each chord is performed
The third layer is how each chord is actually played. In Harmonybeam 1.3, the new Chord Gestures editor gives each chord an expressive attack: a strum, an arpeggio, a note order, round-robin hit slots, velocity and rate curves. Give the piano part humanized timing and velocity, the pad a slow arp, the pluck a randomized roll — per chord, independent of both the progression and the rhythm. The performance that a keyboard player would otherwise have to play in by hand is now a property you can set, copy, and reuse within seconds.
Put together, that is the separation a piano roll can’t quite give you: content (the blocks), rhythm (the pattern), and performance (the gestures), each editable on its own. The result is that the “what ifs” get cheap. Keep the harmonic shape and try a new groove — one click. Keep the groove and audition a different progression — one click. Swap the whole progression out and keep the harmonic rhythm, the pattern, and the gestures exactly where they were. The idea-trying that a piano roll taxes you for becomes nearly free.
The piano roll still has its place
None of this means the piano roll is useless, and Harmonybeam is not trying to replace it. When you need precision — nudging a single note, fixing one hit’s timing, hand-arranging a complicated melody — the piano roll is still the right tool, and nothing here changes that. The point is narrower: the piano roll is often the wrong surface for the exploratory part of writing, the part where the goal is to hear as many reasonable alternatives as possible before deciding. For that part, note-level editing is not precision, it is overhead.
When you can change the chords, the rhythm, and the performance as three separate things with just a few clicks, the editing surface stops dictating what you create. You can be sloppy, fast, and wrong in interesting ways, because correcting is cheap. That is what Harmonybeam is after: not a better piano roll, but a faster route from an idea to something you can hear — especially if you do not play every part in from a MIDI keyboard.
Find out how Harmonybeam helps you write better chord progressions in Ableton Live without fighting the piano roll.
Explore Harmonybeam